Friday, March 28, 2014

Easter Block Letters

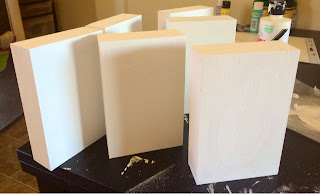
Easter is one of my favorite holidays. It kicks off the spring, and spring is nature's way of celebrating. Plus winter in Utah is depressing, so spring is freaking marvelous!  Any who... I am pumped for Easter. My husband left for the weekend to train with the military, so i crafted myself into a coma.  I made these Easter blocks and if you want to see how i did it stay tuned...


Supplies
Six Wooden Blocks (Mine our 4"x 6")
Coordinating paints of your choice
White Paint
Vinyl letters or stickers (I did mine on my Cricut)
Paint Brush

Step 1
Paint the front side of your block with all the different colors of paint. Let it dry.

Step 2
Apply your letters.


Step 3
Paint all sides of the block white. This will take quite a few layers of paint. Allow the paint to dry thoroughly. I waited two hours.


Step 4 
Remove vinyl letters slowly. Then you are done.


Wednesday, March 26, 2014

Neopolitan Cupcake


Vanilla Cupcake

3 eggs
1 ¾ cup Sugar
½ Cup oil
¾ cup Buttermilk
1 cup Sour cream
2 tsp. Vanilla
½ tsp. Salt
1 tsp. Baking Powder*
2 ¼ cup All-purpose flour

Mix eggs and sugar until lemony color. Add the oil, buttermilk, sour cream, vanilla and then mix.  Add the flour, salt and baking powder.  Mix until smooth.  Fill cupcake liners 2/3 full.  Bake 350 15-18 min.  After cupcakes have cooled take off wrappers.   Makes 24
*If you live at a low altitude you will need to put in 1 ½ -2 tsp. of baking powder.

Chocolate Shell
1 cup Chocolate wafers (the melting discs)
1 Tsb. Coconut oil
(You may need to make 1 ½ batches of this to cover all the cupcakes)
Place ingredients in a shallow microwave safe boil. Cook for 30 seconds, and then stir.  Cook for another 30 seconds.
Dip the bottom of the cupcakes almost to the rim, then place upside down on a cookie sheet and place in the fridge until chocolate hardens.  After chocolate hardens you can place cupcakes in a new cupcake liner.  Then Frost

Frosting
3/4 c. Butter
2 Pounds Powder Sugar (8 cups)
1 tsp.  Vanilla
1 cup Freezer dried Strawberries blended into a powder (it should be about ¼ when all blended)
1/3 c. Milk (you may need a little more)


Allow butter to stand at room temperature for about 30 min.  In a large mixing bowl beat butter with an electric mixer on medium speed until smooth.  Add powder sugar, vanilla extract, strawberries.  Beat in milk until frosting becomes spreading consistency.  I like to pipe the frosting on with 2D star tip.
posted by Charissa

Tuesday, March 18, 2014

Luck of the Irish Rolls

My Mom always celebrated the holidays with holiday themed food. In celebration, of St. Patty's Day I did crock pot beef stew and festive dinner rolls. A very simple way to make the day a little more special.


Luck of the Irish Rolls
1 Cup Warm Water
1 Tbl. Yeast
2 Tbl. Sugar
2 Tbl. Oil 
2 Tbl. Gluten (optional)
1 tsp. Salt
1 Egg
2 1/4 Cup Flour
Green Food Coloring

Mix the first 5 ingredients. Let rest 5 minutes. Then add salt, egg, and slowly add the flour till dough is no longer sticky. (Most likely you will need more than 2 1/4 cups) Add green food coloring during this time. Add whatever amount you need to reach the desired color. Knead for 5 minutes. Let raise for 20 minutes. 

Cut pieces off to form balls of dough. I just eyeballed  it.


 Then place three balls in  each spot  of a greased muffin tin. 


Let raise. Bake at 400 for 10-18 minutes.

Carseat Canopy


I am expecting my first baby in June. A little girl. This is the car seat canopy that I made for her. It is a combination of two tutorials. One had an awesome template for the handles, but I did not care for the canopy template, so I used the measurements for another canopy.  My tutorial is down below.


Supplies
1 1/3 yards of exterior fabric
1 1/3 yards of interior fabric
6-8 inches of Velcro
Pencil
Buttons, Ribbons, any sort of embellishment (optional)
Handle template (go to fleecefun.com click on the canopy tutorial . Download the the template. The download is 15 pages, but you only need page 12 and 15. You can specify that in printing options. A cool trick I learned from super hot/nerdy husband.)

Step 1
Cut the the interior and exterior fabric 32" x 42".( I did mine 36" x 42" and wish I hadn't done it so wide.)

Step 2 (optional)
Round the edges. I traced a plate  to accomplish this.


Step 3
Sew the interior and exterior fabrics together. Make sure the pretty sides are facing each other. Be sure to leave a gap, so you can reach in to turn the fabric right side out. I left about 8 inches.

Step 4
Take your handle template and cut out four handles on the interior fabric
.

Step 5
Sew the handles together; pretty sides together. Leave a gap of  2 inches, so you can turn it right side out.

Step 6
Sew the gaps on the canopy and handles closed.

Step 7
 Draw the gray box from the template on handles. I recommend using a ruler.


Step 8
Pin the Velcro to the handles.  This is very important,  be sure to put one piece on the front side and one on the back side or your handles will not work and you will be sad.


Step 9
Pin handles to the canopy. It is best to do this with the actual car seat since all car seats are different. This will help you place the handles in the best possible position.

 Step 10
Sew handles to the canopy. Follow the lines on the box you drew on the handles.  Make sure that all the fabric is flat, so you do not have any unsightly bunching. 

 Step 11
Attach buttons and embellshiments. I did mine with a needle and thread. You can glue it or if your super cool you can do it with your sewing machine. I'm not that cool.


Ta Da!! You're done!


Saturday, March 15, 2014

Butterscotch and Peanut Butter Chex Mix


9 Cups Chex Cereal
¾ cup Crunchy peanut butter
3 cups butterscotch chips
2 cup Powder Sugar


Measure the cereal into a large bowl.  In a microwave safe bowl add peanut butter and butterscotch chips.  Cook in Microwave for 1 minute, and then stir.   Cook for another 30 seconds, and then stir.  Continue cooking and stirring in 30 second intervals until the chips and peanut butter are melted.  I only had to cook for a total of 2 minutes.   Pour over chex cereal and mix until coated really well.  Add powder sugar and mix until the cereal is well covered.  Then let cool.

Tuesday, March 11, 2014

Heart Sign

This is a fun sign that can be super cute for Valentine's Day. The technique could be applied to a variety projects. It would also be fun to make one for the different holidays. For example, instead of a heart you could do a shamrock, a bunny, a pumpkin or a watermelon for August/September. Just to suggest a few ideas. The only thing you would need to do is change the stencil. The following steps will be for the heart.


Supplies:

Heart Stencil
White, Red, and Black Paint 
A Dry Stiff Bristle Brush ( I like the wooden handle ones you get at Home Depot for $2)
Sponge Paint Brush
Wooden Sign (mine is 11x11 purchased at the Wood Connection)
Valspar Antiquing Glaze (There is a picture below. It can be purchased at Lowe's For $10. You could use black paint instead if you don't antique stuff enough to make it worth the investment.You will achieve better results with the glaze.)

Step 1:
Paint the board white and let it dry.

Step2:
Follow in the instructions on the antiquing glaze. Focusing on the grooves. If you are using black paint use the the dry bristle brush to apply it. Do not put a lot of paint on the brush. You can  use a damp cloth to create the "smudging" effect. Let that dry completely.

Step 3:
Tape stencil down and paint the heart red.

Step 4: (optional)
Use the antiquing glaze or black paint to create a more rustic looking heart using the same technique you did on the white part of the board. Let it dry. Then you are done!


Dry Erase Menu Board

This is a menu board I made to help me plan my weekly meals. It was created to look like a chalkboard menu, but is designed to be used with dry erase markers instead. I can not stand the texture of chalk. It makes me gag, thus the markers. I made this out of an ugly framed picture that I found at a thrift store for $4. If you would like to know how I did this just follow the steps below.


Supplies:
  • A picture frame that still has the glass. (Mine is 20x16) 
  • Cardboard cut to fit in the frame ( I used the back of the picture that came with the frame.)
  • Paint of your choice for the frame ( I used chalk paint. A recipe is easy to find online.)
  • Black and white paint for the cardboard backing. ( I used acrylic paint.)
  • Paint brushes
I cut my lettering out of vinyl on the Cricut Mini. I know a lot of people do not have a Cricut or a Slihouette Cameo, so you could use a stencil or scrapbook material to do your lettering. Whatever works best for you.
You may also notice that I do not have a day for Sunday. This is because my sister and I get together every Sunday for dinner. So I am not crazy :)

Step 1:
Take the picture apart.

Step 2:

Mix your black and white paint till you reach the desired shade for a "chalkboard." Then paint the cardboard. You will need to do a few coats till the cardboard is completely covered.

Step 3:

Paint the frame. 


Step 4:

After the cardboard has dried,  apply your lettering to the cardboard surface.

Step 5:

Clean the glass super good! I learned this the hard way :(

Step 6:

Reassemble the picture frame and backing.

Step 7:

You will need to secure the backing in. I used duct tape. Ghetto but effective. You could staple it or glue it. I do recommend the duct tape, because if you decide to change the colors in the future it is easy to take picture apart.

Step 8:

Hang your completed menu board! I hung mine on the fridge with magnets. If you go this route, you will want the huge industrial ones. You can purchase those at Home Depot. Use your favorite strong glue to attach them. I love Gorilla epoxy glue.  Do not use the craft magnets! I did this with my first menu board and it fell off the fridge and died a horrible death.


Saturday, March 1, 2014

Mini Mousse Pies


I made these little mini pies for a dinner I did for a school for parent teacher conference.
They were a big hit.

8oz Chocolate Chips
14 oz can Sweetened Condensed Milk
1/2 teasp. Vanilla
2 cups Heavy Whipping Cream Whipped
12 small graham cracker crusts (Keebler makes great ones)
Canned Whip Topping


Whip heavy whipping cream until stiff.  Melt Chocolate Chips in the microwave until melted. (When melting chocolate in the microwave you only want to cook 15-30 seconds at a time).  Add the sweetened condensed milk and vanilla, mix together.  And then fold in the whipped whipping cream. And then spoon into mini pie shells.  I topped it with Whip Topping from a can and grated a little chocolate on top and make this little design out of some melted chocolate.  Makes 12